
Welcome to Rogue Squadron, pilot! In this series, we will be looking at different squadrons you can fly in Atomic Mass Games X-Wing miniatures game. We give you the squad and then give you the lowdown on how best to fly it. Strap in and get ready to fly.
All Wings Report In
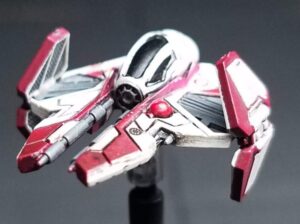 Eta-2 Actis Interceptor “Obi-wan Kenobi” (5 pts) (I5)
- Pilot Ability
- After you or a friendly Anakin Skywalker at range 0-3 executes a maneuver, if there are more enemy ships than other friendly ships at range 0-1 of that ship, you may spend 1 Force. If you do, that ship gains 1 focus token.
- Ship Ability – Intuitive Controls
- During the System Phase, you may perform a purple Boost or purple Barrel Roll action.
- Loadout (15/15)
- Astromech – None (-)
- Cannon – Ion Cannon (6)
- Forward Arc Attack (3) Range 1-3
- If this attack hits, spend 1 Hit or Crit result to cause the defender to suffer 1 Hit damage. All remaining Hit/Crit results inflict ion tokens instead of damage.
- Force – Shattering Shot (3)
- While you perform an attack, if the attack is obstructed by an obstacle or the defender is at range 0 of an obstacle, you may spend 1 Force to add 1 Focus result.
- Force – Patience (2)
- At the start of the Engagement Phase, if there is an enemy ship in your Forward Arc, you may gain 1 deplete token to recover 1 Force.
- Modification – None (-)
- Talent – Trick Shot (4)
- While you perform an attack that is obstructed by an obstacle, roll 1 additional attack die.
Eta-2 Actis Interceptor “Aayla Secura” (5 pts) (I5)
- Pilot Ability
- While an enemy ship in your Forward Arc at range 0-1 performs an attack, the defender may change 1 blank result to a Focus result.
- Ship Ability – Intuitive Controls
- During the System Phase, you may perform a purple Boost or purple Barrel Roll action.
- Loadout (15/15)
- Astromech – None (-)
- Cannon – Ion Cannon (6)
- Forward Arc Attack (3) Range 1-3
- If this attack hits, spend 1 Hit or Crit result to cause the defender to suffer 1 Hit damage. All remaining Hit/Crit results inflict ion tokens instead of damage.
- Force – Shattering Shot (3)
- While you perform an attack, if the attack is obstructed by an obstacle or the defender is at range 0 of an obstacle, you may spend 1 Force to add 1 Focus result.
- Force – Patience (2)
- At the start of the Engagement Phase, if there is an enemy ship in your Forward Arc, you may gain 1 deplete token to recover 1 Force.
- Modification – None (-)
- Talent – Trick Shot (4)
- While you perform an attack that is obstructed by an obstacle, roll 1 additional attack die.
Eta-2 Actis Interceptor “Shaak Ti” (5 pts) (I4)
- Pilot Ability
- At the start of the End Phase, you may spend any number of Force to choose that many friendly ships at range 0-2. Each chosen ship does not remove 1 focus or evade token during this End Phase.
- Ship Ability – Intuitive Controls
- During the System Phase, you may perform a purple Boost or purple Barrel Roll action.
- Loadout (18/18)
- Astromech – R7-A7 (3)
- Charges: 3
- While you perform an attack, you may spend 1 Charge to change 1 Hit result to a Crit result.
- Cannon – Ion Cannon (6)
- Forward Arc Attack (3) Range 1-3
- If this attack hits, spend 1 Hit or Crit result to cause the defender to suffer 1 Hit damage. All remaining Hit/Crit results inflict ion tokens instead of damage.
- Force – Shattering Shot (3)
- While you perform an attack, if the attack is obstructed by an obstacle or the defender is at range 0 of an obstacle, you may spend 1 Force to add 1 Focus result.
- Force – Patience (2)
- At the start of the Engagement Phase, if there is an enemy ship in your Forward Arc, you may gain 1 deplete token to recover 1 Force.
- Modification – None (-)
- Talent – Trick Shot (4)
- While you perform an attack that is obstructed by an obstacle, roll 1 additional attack die.
- Astromech – R7-A7 (3)
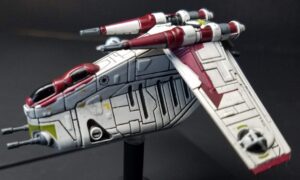 LAAT/i “Hound” (5 pts) (I2)
- Pilot Ability
- After a friendly small ship in your Turret Arc gains a deplete or strain token, if you have no tokens of that type, you may transfer that token to yourself.
- Ship Ability – Fire Convergence
- While a friendly ship performs a non-Turret attack, if the defender is in your turret arc you may spend 1 charge token, if you do the attacker may reroll up to 2 results.
- Loadout (23/23)
- Crew – Yoda (12)
- Force: 2
- Adds Coordinate
- After another friendly ship at range 0-2 fully executes a purple maneuver or performs a purple action, you may spend 1 Force. If you do, that ship recovers 1 Force.
- Crew – None (-)
- Gunner – Seventh Fleet Gunner (8)
- Charges: 1
- While another friendly ship performs a primary attack, if the defender is in your firing arc, you may spend 1 Charge. If you do, the attacker rolls 1 additional die, to a maximum of 4. During the System Phase, you may gain 1 disarm token to recover 1 Charge.
- Gunner – Agile Gunner (3)
- During the End Phase, you may rotate your Turret indicator.
- Missile – None (-)
- Missile – None (-)
- Modification – None (-)
- Sensor – None (-)
- Crew – Yoda (12)
Lock S-Foils in Attack Position
I went to the Lonestar Open this year. It was a big deal last year but I unfortunately wasn’t able to attend. Apparently, that was true for a lot of people this year as attendance was only half of what was expected. But that was still over 30 people which still meant plenty of X-Wing to play.
 At the last tournament I attended, I went full swarm. This time, I went with something completely different. I have not put the Eta-2 or LAAT on the table much since they came out. With all the hubbub about Trick Shot and Shattering Shot and the recently Ion changes, the Eta-2 became the perfect platform to toy with a combo I was interested in. Trick and Shattering can combo into impressive damage. Ion now stripping away Locks from ships makes it a great way to prevent proton torpedoes from flying at your face. The downside too Ions now is the ability to bank. There were a few times where ion would have been the right choice to force an opponent onto an obstacle, but with the ability to bank now, they were going to do that maneuver anyways. Sometimes, ioning would have actually helped them as the ship couldn’t normally one bank.
The LAAT wasn’t my first ship to add to my group of Eta-2’s. I could have taken another Eta or an Aethersprite, but since I only have three Eta’s and an Aethersprite would have been a very different type of ship, I decided they could benefit from some support. This proved a solid choice as Hound definitely pulled his weight. With ten health, he was a meat shield to absorb some shots the Eta’s couldn’t handle. His ability worked great to keep the Jedi flush with Force as they could use Patience and he could yoink the deplete away. He also saved them from scum delivered strain a few times. Meanwhile, with Yoda onboard, the other Jedi were free to use their purple talon roll and Intuitive Controls with less Force drain. Coordinate came in handy a few times too.
I’ll do a quick run down of the tournament below but as I ended with a 2 win 3 loss record, this isn’t a meta crushing this. The Eta-2 with this build can kick some serious ass BUT it would work better as one piece in a mixed squadron, rather than a full group.
Round 1- Assault at the Satelite Array- John Henderson
This was a similar concept to my alternative list for the tournament, four Rebel beefy ships. My inexperience with the Eta-2’s hampered me here as, in order to take on a group of ships with more health and higher initiative you have to outfly them. I did not. My Ion Cannons did do their job though as I was able to ion Dutch, clearing his double locks and preventing him from giving away a free lock the next round. That was the only real victory that game, though I was able to score at least a few mission points.
Round 2- Chance Engagement- Ryan Clark
I managed to pull off a win in this game but it was a close one. Part of it came down to luck. I faced down Q9, and his Dengar in the first pass. I risked firing, knowing he would Dengar me and potentially strip away one third of my health. But I got lucky and he took a double stress crit and Dengar whiffed. That kept his Razorcrest out of action for quite awhile thanks to its terrible blue options and being near the board edge so being forced to bank and not clear stress. I also managed to ion the Firespray at one point which was unexpected, as I had only fired on him using Ion for the extra attack dice.
Round 3- Scramble the Transmission- Greg Ferrington
I’ve faced Greg before, twice in the last Houston tournament. He was flying something very similar to that, which is a heavy array of Imperial ships. This ended up being the lowest scoring game I’ve ever played in, 9 to 2. Neither of us wanted to waste actions on the objectives, each only grabbing one late in the game. I managed to pull off a win thanks to getting the dream shot. Bullseye, range 1, through a rock, modified via Fire Convergence and a focus token with Shaak Ti. Ended up with four crits and two hits against the Decimator. Neither of us could kill any of the other ships because all of our three agility ships keep either whiffing on attacks or rolling amazing on defense.
Round 4- Salvage Mission- Emilio Benavides
I got straight up out flown on this one. Luck certainly played a part. Honestly, I did shoot at his ships a whole bunch of times. But I just couldn’t push any damage through. I didn’t get as many obstructed shots as in some other games, which played a role, but I did get some. He just always rolled enough evades and I couldn’t concentrate enough fire. So I ended up not giving him a single damage card, earned zero points, and my whole list wiped. Aethersprite Obi-wan is superior to Eta-2 Obi-wan.
Round 5- Assault at the Satelite Array- Ryan Neusch
This ended up being my funnest game of the day. I lost but it honestly could have gone either way several time. One round in particular swung to his favor and we both knew that was probably the decisive turn. I had a range 0 shot on a 1 health Gauntlet but whiffed on the attack. Had I succeeded, the Gauntlet dies, and my Shaak Ti doesn’t because he can’t shoot her. That same round, Shaak Ti also rolled three hits and a crit against a Vulture. He rolls double evade. Had he one less evade or the crit been direct hit, that’s another shot Shaak Ti doesn’t take and therefore would have survived the round. Now, it was my fault for putting her in that position, but was the best place to be as it avoided a Grievous shot from behind and Aayla also deleted another Vulture that same round. I had also gotten another dream shot earlier in the game, which was why the Gauntlet had only one health left. So overall, a lot of fun but sometimes the variance doesn’t go your way.
Loadout Variations
There isn’t much you can change loadout wise and keep the same feel of this list. Ion Cannons are the main thing you could switch out, as Ion isn’t the main point, but they are still the best way to ensure you’re always rolling at least three dice. Seventh Fleet Gunner would be the next best thing to change. It helped a few times, but I was amazed at how many times I didn’t want to recharge it and lose Hounds shot. I went into the tournament not caring if Hound shot. But when I kept him in the mix, and therefore relevant, he ended up with a range 1 shot fairly often.
 Check out Wayne’s new book, Seraph’s Bind, out August 1 and running a launch sale for only $0.99.


Wayne Basta
Latest posts by Wayne Basta (see all)
- X-Wing Tier List – Rebels - May 10, 2023