
Welcome to Rogue Squadron, pilot! In this series, we will be looking at the ships you can fly in Fantasy Flight Games X-Wing miniatures game. We’ll take a look at a chassis and what makes it unique along with some upgrades and squadron combos. Strap in and get ready to fly.
Lock S-Foils in Attack Position
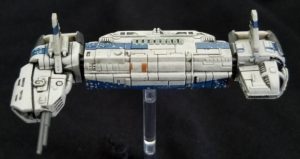
When this ship was first announced, I gave it a “meh.” As one of the few unique designs to come out of the new trilogy, FFG couldn’t not add it to the game, though it’s a bit odd it came out now, as this brought an imbalance with the First Order. Especially given that this ship is essentially two ships. Regardless, it’s not a pretty ship and first impression pegged it as just an ugly support ship. Who wants to zoom through space on this thing?
Now that it’s out, it turns out to be an ugly support ship. But a very good support ship. Its dial is very restricting, full of reds and lacking any kind of turn around. It makes up for this with a stop and reverses. It also comes with an Astromech slot which allows you to vastly improve the basic dial using an R4. There’s also a Tech slot for Pattern Analyzer so those red maneuvers are not interfering with your ability to take actions.
The pilots themselves really make the ship shine though. They’re all good. It’s a tough choice deciding which one you can exploit the most. You can have cheap generic, action economy, red maneuvers while stressed or extra dice. They all work in different ways with the new crew options, of which the pack has many.
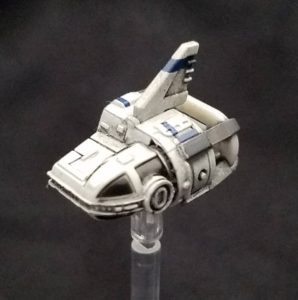
The Resistance Transport Pod is a weird little ship. Unlike the big ship, it can turn around. But its dial is still bad. On top of red maneuvers it has many basic red actions. It does fill a role the Resistance lacked: a cheap ship. At under 30pts, they can work as filler, which has some value. It’s not a great ship but when the next cheapest is 7pts more, sometimes that’s the difference between getting an extra ship and having to sacrifice a crucial upgrade or pilot.
Red Five Standing By
 The Resistance Transport comes with 4 different pilots. Below I’ve ranked them along with some notes on them. The difference between them comes down to playstyle in many ways so the three named pilots were all fairly equal.
- Nodin Chavdri (I2)
- Her ability gives her great action economy. It’s a support ship so you want to coordinate. But it’s also nice to get your own action.
- She really likes R4 astromech and Korr Sella onboard. Easier to clear all that stress you’ll be gaining.
- Cova Nell (I4)
- A fighting support ship. Extra defense and attack dice when you take one of her many red maneuvers. Extra dice are always good.
- Too bad there’s no Hera Syndulla crew for Resistance. Then she’d be unstoppable.
- If she wants to still act as a support ship, she’ll want Pattern Analyzer and Larma D’acy. Take a red, get a regular action for herself. Then can still Coordinate/Jam thanks to Larma. Korr Sella is also handy to clear all that stress.
- It’s a debate if you want R4. On one hand, you’ll need to clear the stress you gain so hard 2’s will come in handy. On the other, you lose the hard 1 as a red maneuver to help trigger your ability.
- Leia makes a great, but expensive, partner for her. Since it’s revealed maneuver, you can keep taking those reds round after round, treating them as white when executing, and getting your bonus dice.
- Pammich Nerro Goode (I3)
- Taking multiple stops or reverses in a row can cause your opponent some trouble.
- While handy to do, it does limit your ability to offer your squad support. You could take Larma, then you could stop, Coordinate, have two stress and still stop next round. Or your could take Tactical Officer, stop, Coordinate, end up with one stress so can stop again next round. Either way, you can’t Coordinate and stop two rounds in a row.
- Logistics Division Pilot (I1)
- Sometimes you really want to Coordinate at the very beginning of the round so you can reposition your ships into the way of your opponent.
- Several points cheaper than any of the named pilots. You can get a basic support ship for a lot less if you forgo any pilot abilities.
 The Resistance Transport Pod has some great pilots as well. Though less in terms of support.
- Vi Moradi (I1)
- Despite being I1, Vi makes a great addition to a squad. Her Compromising Intel helps your mid-range initiative pilots avoid those arc dodgers. And it also makes her less tempting of a target so she’s harder to kill than she should be.
- Works great all by herself in quite a few lists just as an annoyance.
- Finn (I3)
- In some ways, Finn can be considered to have three attack and three defense. He can add results, bringing the dice up. Being able to use them can prove tricky.
- Perceptive Co-Pilot is a good friend. If you use his ability defensively, or when you’re only being attacked by single higher initiative pilots, you can gain the strain to add a Focus result and then still have a Focus for later.
- Elusive has a place on him as it will let him reroll the blank defense die he gains. Advanced Optics also looks good on Finn. As does Heroic, as rolling double blanks isn’t that unlikely, you can then add a blank and reroll three.
- Rose is also a tempting crew because he can then gain Locks without stress spending his free blank result.
- Rose Tico (I3)
- Jess Pava and her will be good friends.
- Note her offensive rerolls require friendly ships to be in her arc. She’ll want to fly to the rear of a formation.
- If her defensive rerolls trigger, your opponent will probably fire on the other ship it has in arc as most things will be a bigger threat than her. In that sense, her ability may actually be a liability for her squad unless you make her worth shooting at.
- BB-8 (I3)
- Pre-maneuver boost/barrel rolls are nice. They are red but BB-8 can clear them with a blue maneuver. Unfortunately, the selection of blues is limited. Too bad there’s no astromech slot on the pod.
- He’s a good candidate for Primed Thrusters.
- One important note is that as a droid, he has the Calculate action. If C-3P0 is somewhere else in the squad, he can be coordinated from anywhere on the board.
All Wings Report In
What’s the ideal number of Resistance Transports to buy? One to two. You get both the pod and transport in one pack. You generally don’t want to overload your squad with support. And a lot of their shenanigans depend on Korr Sella to pull off, and she’s unique. That said, there is a potential place for them as cheap torpedo carriers and the transport pod is quite cheap so can squeeze in a lot of places.
- 2x Green Squadron Expert (A-Wing)
- Advanced Optics
- Heroic
- Rose Tico (Transport Pod)
- Advanced Optics
- Heroic
- Finn (Transport Pod)
- Advanced Optics
- Heroic
- Jess Pava (T-70 X-Wing)
- Advanced Optics
- Integrated S-foils
You could do a similar list to this before with five A-Wings. But Rose and Finn add some new flair and are cheap enough that you can also squeeze Jess Pava in. This gives you far more firepower compared to just the A-Wings.
- Poe Dameron (T-70 X-Wing)
- Black One
- R4 Astromech
- Heroic
- Autoblaster Cannon
- Integrated S-Foils
- Cat (MG-100 Starfortress)
- Trajectory Simulator
- Pattern Analyzer
- Proton Bombs
- Seismic Charges
- Delayed Fuse
- Logistics Division Pilot (Resistance Transport)
- Amilyn Holdo
- R4 Astromech
The transports roll in this is mostly a Holdo carrier but don’t discount the value of Coordinating Poe or the bomber either. Cat lobs bombs in the direction your opponent is going to come from. Then stops and Reloads. She can make use of Fuses to have the bomb sit there and wait a round for them to approach. Fuses also give her some options for getting to make use of her ability. Holdo can pull either the stress from Cat so she can stop again next round or the weapons disabled from the reload if she needs to shoot. Poe, meanwhile, either acts as a flanker, risky, or just sits back in the pile until it’s time to engage. Then he four straights and then Black Ones to four-k behind the approaching enemy and beyond range of the bomb. Later, the transport and Holdo can follow Poe around to pull his stress off or keep aiding Cat. She could also pull the ion token off if she’s close enough after the Black One use.
- 4x Logistics Division Pilot (Resistance Transport)
- Proton Torpedo
- Pattern Analyzer
This is a simple idea. Saturate them with torpedoes. With their stop or reverse maneuver, you can get yourself to just in range, fire torp one, then stay there or go backwards, get the Lock thanks to Pattern Analyzer and fire two. It’s not great because you are Init 1, so that first shot might be hard to pull off. But no ones going to expect it.
Posted this one a few weeks ago.


Wayne Basta
Latest posts by Wayne Basta (see all)
- X-Wing Tier List – Rebels - May 10, 2023