
Welcome to Rogue Squadron, pilot! In this series, we will be looking at the ships you can fly in Fantasy Flight Games X-Wing miniatures game. We’ll take a look at a chassis and what makes it unique along with some upgrades and squadron combos. Strap in and get ready to fly.
Lock S-Foils in Attack Position
 Incoming! First Order can now launch bombs, something they didn’t have access to before the release of the TIE/se Bomber. They also gained a torpedo carrier. Technically they could before, but whoever loaded a torpedo onto a Silencer?
This continues the trend of making the sequel trilogy factions identical to their original trilogy equivalents. But this issue isn’t X-Wings’ fault. The game designers didn’t make the movies. They at least made the Whisper, despite its visual and style similarities to the Silencer, at least feet like a unique ship with its emphasis on jamming.
The SE Bomber itself feels like a cross between the TIE/sa Bomber and the Punisher. It has Pursuit Thrusters, and a cool system phase boost ability but is still a small base and feels designed around bombing. The system phase boost helps it find the optimal position to drop a mine or bomb. Either boost first to get a better angle for deployment, or boost second to gain even more distance after your maneuver to avoid getting hit by your own device.
The dial provides more options than the Imperial bombers, allowing the ship to take hard 1 turns and S-loop. However, with all of its blue maneuvers being straight, if you get stressed you are going to be predictable. This style of dial was limiting for Y-Wings in 1.0, and causes trouble for Republic Y-Wings in 2.0. But they at least always had the option to gain more with an R4 astromech. The SE bomber has no choices to help it get more blue maneuvers.
However, it does have a tech slot so Pattern Analyzer or Primed Thrusters gives you some choices to help your action economy. Primed Thrusters would allow you to still use your chassis ability to boost in the system phase despite being stressed. This would allow you to bank and change your heading before taking your straight maneuver to clear the stress. Unfortunately, Primed Thrusters are quite expensive, even on your low initiative pilots.
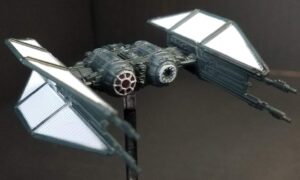
The model itself is very cool looking. It’s essentially a TIE Bomber with inverted wings, but despite that, it makes the ship look far more menacing.
Red Five Standing By
The TIE/se Bomber comes out of the box with your standard four unique pilots and two generics across two ships. How do these pilots compare?
- Breach (I5) – After you fully execute a maneuver or perform a Boost action, if you moved through an enemy ship, you may acquire a lock on that ship.
- An I5 bomber is a nice option for an alpha torpedo strike.
- At only a few points more than the cheapest generic, he is also quite affordable.
- Making use of his ability can be tricky. Ideally, you want to get that lock and use it, but your only turn around maneuver is a 3 speed S-loop. Boosting through a ship can only be done from a few very limited positions.
- You can fly through an enemy while you are disengaging, get the free lock, reload and then come back the next round with only needing to focus for double mods.
- Grudge (I2) – While a friendly bomb or mine at range 0-2 detonates, each time attack dice are rolled to resolve its effect, you may reroll up to 1 of those dice.
- Despite being I2, Grudge is currently costed the same as Breach at I5.
- His ability is a force multiplier, similar to Howlrunner, but much less valuable.
- He must be within range 2 of the detonating device, that requires dice rolls to have any affect.
- The only ships that can carry a payload are other bombers.
- Quite a few devices require dice rolls: Bomblet Generator, Proximity Mines, Cluster Miners, Electro-Proton Bombs, and Thermal Detonators.
- Scorch (I4) – While a friendly ship at range 0-1 performs a primary attack, it may spend 1 Hit result. If it does, after defending, the defender gains 1 strain token.
- Scorch is a team player. He fires, scrubs one hit to give a strain to make the next attack hit harder. This is handy with his measly two dice primary.
- Used best when he snipes from long range to allow another heavier hitter to get extra damage.
- It’s hard for him to let others use his ability due to the range bubble but not impossible.
- His initiative is unfortunate as there are no other I4 bombers he can tag team with.
- Dread (I3) – After you reload, each ship in your Bullseye gains 1 deplete token.
- This is a nice add-on ability. I wouldn’t want to aim to make use of it regularly, but when he does reload, being able to deplete someone in front of him, who conceivably is going to attack him while he can’t attack back, is handy.
- If you can ever line up a bullseye on multiple ships, rare but does happen, he might want to reload just to trigger the ability.
- Deuterium Power Cells would allow him to use his ability to reload and still shoot. But that is an expensive combo, since you will also need some ordnance that needs reloading.
- First Order Cadet (I3) – None
- Your typical generic with a talent slot.
- At only one point more than the I2, well worth the cost.
- Sienar-Jaemus Test Pilot (I2) – None
- Your cheap generic pilot.
- Feels high priced for what you get.
All Wings Report In
How many TIE/se Bombers do you need? You can field a squadron of up to six of them. Six aren’t bad but you’d be better off with five and some upgrades. Either way would require you to purchase three Fury of the First Order boxes, which is a lot. Fortunately, you can make a fair number of good lists with just the pair.
- Grudge (TIE/se Bomber)
- Automated Targeting Priority
- Thermal Detonators
- Bombardier
- 4x Sienar-Jaemus Test Pilot (TIE/se Bomber)
- Automated Targeting Priority
- Choice of:
- Proximity Mine
- Cluster Mine
- Thermal Detonators + Bombardier
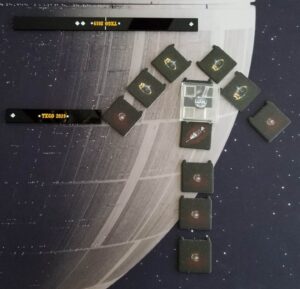
Five bombers is a classic chunky list with a First Order flare over Imperial versions. ATP gives them some more punch potential, allowing them to get soft double mods. The main offense is the payloads. With all of your ships moving at I2, they can deploy their mines/bombs in whatever order works best for the formation. Grudge will want to try and remain within range two of the payloads, to force rerolls and maximize the value of each detonated device. This can be difficult with Thermal Detonators, as he risks getting caught in the blast himself. But mines are perfectly safe to remain near. Thermals, however, can be reloaded as needed and can provide better board coverage to catch your opponent’s ships. Five bombers, dropping two thermals, with their system phase boost and bombardiers can cover a huge area of the map with bombs.
This List is More Than Just Kylo
- Breach (TIE/se Bomber)
- Primed Thrusters
- Proton Torpedo
- Lieutenant LeHuse (TIE/sf Fighter)
- Homing Missile/Mag-Pulse Warhead/Cluster Missile
- Passive Sensors
- First Order Ordnance Tech
- Kylo Ren (TIE/vn Silencer)
- Malice
- Primed Thrusters
This list isn’t all about Kylo Ren. Really. Just try to ignore Breach’s Proton Torpedo or LeHuse’s missile. Both have six health backed by two defense die so won’t drop super fast. The passive sensor allows LeHuse to almost always have a shot with his missile, even those pesky I6s. If he takes Cluster, he can fire, get rerolls with his lock, and then use Breach’s if need be on the second shot. Homing allows him to do consistent, if low, damage. Ordnance Techs let him reload like a bomber to keep using that ordnance. Breach has Primed Thrusters so he can clear stress without being predictable, which will be useful after he S-loops through a target for an unexpected torpedo attack from behind.
- 2x First Order Cadet (TIE/se Bomber)
- Proton Torpedoes
- Feedback Ping
- Cluster Mines
- First Order Cadet (TIE/se Bomber)
- Plasma Torpedo
- Feedback Ping
- Cluster Mines
- First Order Courier (Xi Class Shuttle)
- Agent Terex
- Sensor Buoy
- Targeting Synchronizer
This list has ample opportunity for your torpedo carriers to acquire locks. You start the game with sensor buoys out. This gives your shuttle a chance to get a lock. But more importantly, they are devices. If your opponent lands near them, your bombers can gain free locks on that ship thanks to Feedback Ping. This helps them to come into the initial range three engagement with, not only a lock against a high initiative ship, but also double mods as they’ll be able to use their action to focus. Further, they can deploy their Cluster Mines strategically around the board so your opponent either hits them, or gives you a free lock on them.
 Scorch the Midnight’s Wrath
- Scorch (TIE/se Bomber)
- Proton Torpedo
- Fanatical
- DT-798
- Wrath (TIE/wi Whisper)
- Sensor Scrambler
- Enhanced Jamming Suite
- Midnight (TIE/fo Fighter)
- Fanatical
- Targeting Synchronizer
- Major Vonreg (TIE/ba Interceptor)
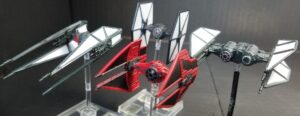
This list has a lot of different things going on. Wrath and Vonreg are on the flanks, passing out jams and deplete. Midnight sticks near Scorch, gets a lock on the primary target, fires, cancels a hit and gives the opponent a strain. Vonreg and Wrath fire on different targets. Scorch will fire last. He can use Midnight’s lock thanks to Targeting Synchronizer to fire a proton torpedo. With DT-798, from all the token throwing possible with the list (jam from Wrath, deplete from Vonreg, strain from Scorch, strain from DT-798) he should have rerolls aplenty. Since hee focused as his action, his torpedoes are double modded. After Scorch is torn apart, you still have two I6’s and an I5 for your opponent to contend with.
- Dread (TIE/se Bomber)
- Deuterium Power Cells
- First Order Ordnance Tech
- Advanced Proton Torpedo
- Ion Missile
- 3x Omega Squadron Expert (TIE/sf Fighter)
- Saturation Salvo
- Concussion Missile
- First Order Ordnance Tech
- Automated Targeting Priority
- Passive Sensors
Dread has an interesting ability. Passing out depletes are nice, one less attack die being thrown your way. But to use it, you need to reload, which means you’re not throwing any attack dice. In comes with Deuterium Power Cells. A pricey upgrade thanks to the option to regenerate shields. But it also has a secondary ability, which allows you to trade a token for a stress. If Dread can get someone in his bullseye, he can reload, pass a deplete, get a lock (thanks to FO Ordnance Tech) and use DPS to trade the weapons disabled for stress. Then he’s all set to fire his ordnance again. The three SF’s flit around causing trouble being able to lock and rotate their arc when they engage, so they don’t need to pick their target ahead of time.


Wayne Basta
Latest posts by Wayne Basta (see all)
- X-Wing Tier List – Rebels - May 10, 2023