
Welcome to Rogue Squadron, pilot! In this series we will be looking at different squadrons you can fly in Fantasy Flight Games X-Wing miniatures game. We give you the squad, what expansion pack all of the upgrades come from and then give you the low down on how best to fly it. Strap in and get ready to fly…
All Wings Report In
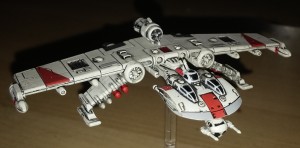 K-Wing “Miranda Doni” (K-Wing Expansion) (48 pts) (PS 8)
Once per round when attacking, you may either spend 1 shield to roll 1 additional attack die or roll 1 fewer attack die to recover 1 shield.
- Turret– Twin Laser Turret (K-Wing Expansion): Attack (3, range 2-3): Perform this attack twice (even against a ship outside your firing arc). Each time this attack hits, the defender suffers 1 damage. Then cancel all dice results.
- Crew- Sabine Wren (Ghost Expansion): Your upgrade bar gains the Bomb upgrade icon. Once per round, before a friendly bomb token is removed, choose 1 enemy ship at Range 1 of that token. That ship suffers 1 damage.
- Modification- Advanced SLAM (K-Wing Expansion)- After performing a SLAM action, if you did not overlap an obstacle or another ship, you may perform a free action.
- Torpedo- Extra Munitions (K-Wing/TIE Punisher Expansions)– When you equip this card, place 1 ordnance token on each equipped Torpedo, Missile and Bombe Upgrade card. When you are instructed to discard an Upgrade card, you may discard 1 ordnance token on that card instead.
- Bomb- Proximity Mine (IG-2000/Slave-1 Expansions): Action: Discard this card to drop 1 proximity mine token. When a ship’s base or maneuver template overlaps this token, this token detonates.
Proximity Mine Token: When this bomb token detonates, the ship that moved through or overlapped this token rolls 3 attack dice and suffers all damage and critical damage rolled. Then discard this token. - Bomb: Seismic Charge (IG-2000/Slave-1/TIE Bomber): When you reveal your maneuver dial, you may discard this card to drop 1 seismic charge token. This token detonates at the end of the Activation phase.
Seismic Charge Token: When this bomb token detonates, each ship at Range 1 of the token suffers 1 damage. Then discard this token. - Bomb: Seismic Charge (IG-2000/Slave-1/TIE Bomber): When you reveal your maneuver dial, you may discard this card to drop 1 seismic charge token. This token detonates at the end of the Activation phase.
Seismic Charge Token: When this bomb token detonates, each ship at Range 1 of the token suffers 1 damage. Then discard this token.
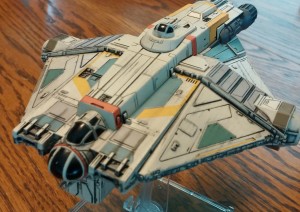 VCX-100 “Lothal Rebel” (Ghost Expansion) (52 pts) (PS 3)
None
- Turret– Twin Laser Turret (K-Wing Expansion): Attack (3, range 2-3): Perform this attack twice (even against a ship outside your firing arc). Each time this attack hits, the defender suffers 1 damage. Then cancel all dice results.
- Crew- Hera Syndulla (Ghost Expansion Expansion): You may reveal and execute red maneuvers even while you are stressed.
- Crew- Ezra Bridger (Ghost Expansion Expansion): When attacking, if you are stressed, you may change 1 of your Focus results to a Critical result.
- Torpedo- Extra Munitions (K-Wing/TIE Punisher Expansions)– When you equip this card, place 1 ordnance token on each equipped Torpedo, Missile and Bombe Upgrade card. When you are instructed to discard an Upgrade card, you may discard 1 ordnance token on that card instead.
- Torpedo- Plasma Torpedo (Kihraxz Expansion): Attack (target lock) (4, range 2-3): Spend your target lock and discard this card to perform this attack. If this attack hits, after dealing damage, remove 1 shield token from the defender
- Modification– Guidance Chips (Inquisitor’s TIE/Punishing OneExpansion): Once per round, when attacking with a Torpedo or Missile secondary weapon, you may change 1 die result to a Hit result (or a Critical result if your primary weapon value is “3” or higher).
- System- Fire Control System (B-wing/TIE Phantom Expansions): After you perform an attack, you may acquire a target lock on the defender.
Lock S-Foils in Attack Position
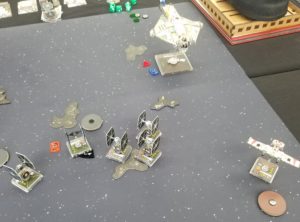
I went to my first X-wing Regional championship recently. I’d been to many weekend tournaments and store tournaments but never gone to anything that required some travel. This regional was in Dallas at Madness Games and was quite a lot of fun. A total of 113 players showed up for some X-Wing about 13 or so were from Apollo Squadron, the Houston group I’m part of. Me and one other squadmate ended up making it to the Top 8. We both ended up getting knocked out that round by the two players who ended up being in the final match.
I debated what to fly and for awhile was planning to take some variation of a Biggs/Kanan list. While that can be a pretty strong list after playing it for awhile I had started to get a little bored with it. Such is my curse as I can rarely play the same list for very long.
At a recent tournament I saw a player bring a variation of my above list and it looked like a lot of fun. His list included Chopper as a pilot, didn’t have torpedoes and had less bombs. But I really liked the combination of Sabine on Miranda and a Ghost escort. With extra munitions that’s six bombs on a single ship. You can drop them every round almost which makes you far more likely to actually use them.
At a later date I might run through the things I learned about X-wing and the experience of a large tournament but for now I’m just going to go through the rounds I played and how the squadron worked.
 Round 1- Crack Swarm (Howlrunner, Omega Leader, 4x Black Squadron) (Win)
My day had nice symmetry as my first and last games were against Crack swarms (4+ ships all with Crack Shot). I wasn’t particularly concerned with Crack Shot itself since Ghost has zero agility and Miranda only one. But swarms are always trouble, especially against Ghost as they can chew through it faster than it can kill them.
Fortunately this game the dice were in my favor and my opponent, Kenny from the Kessel Run Podcast, hadn’t flown a swarm in quite awhile so was still warming up. I ended up dropping a TIE every other round (I would either do no damage or kill a ship in a round). TLT proved the most useful here as it gave me four shots instead of two which gave the advantage to the red dice. The bombs only really came into play as a threat.
Round 2- Double Ghosts (Hera and Kanan) (Win)
My second round I went up against a double Ghost list. I’ve thought about flying something like this but don’t really want to buy a second Ghost just to do so. 32 hitpoints is a lot for anything to chew through. Unfortunately for my opponent, the list suffered from the main failing of the Ghost; Hera pilot is only PS 7. With Miranda at PS8 she was able to SLAM out of arc and dropped a few bombs. Combined with the double TLT’s allowed me to plink away at the pair of ships from range three while his autoblaster turrets only worked at range 1.
Round 3- Palp Aces (Soontir, Inquisitor, Capt Yorr) (Win)
This was a list I had some concern with going into the match. Palp Aces is a tough combo to face with any list. A double autothruster ace with Palpatine backup effectively neutered my TLT’s. They did very little damage in this game except versus the shuttle.
What worked amazingly well were the bombs. The bombs won me this game. Well, it’s really more accurate to say that the bombs lost my opponent his game. As he admitted, he was not prepared for the bombs. Flew Soontir right over a seismic and then continued to chase Miranda, allowing me to just drop a Prox mine on him before he moved. Later he misjudged a barrel roll and placed right into a spot where Miranda could bomb the Inquisitor.
Round 4- Stressful Rebel Regen (Miranda/Poe/Stresshog) (Lost)
Going into round four there were six Houston people who were undefeated out of sixteen total undefeateds. By some unbelievable odds all six of us were paired off against each other, ensuring three would lose. I was one of them.
I don’t want to discredit the skill of my opponent here but this was a game that I lost for myself. I made the mistake of taking my Miranda toward a corner in an effort to avoid the stresshog. That effectively guaranteed I would get double stressed the next round. After that Miranda was done for. Losing the ability to SLAM, and also drop Prox mines, doomed her. Had I taken the first double stress earlier I would have had the entire board to use to escape and shed the stress.
I also failed to drop a bomb when I should have. Even if it had missed everyone, it would have probably forced his Poe to boost instead of focusing, giving me the chance to not die to a modified attack and/or kill him instead because his defense would have been unmodified.
Round 5- Ghost Stress (Hera with Zeb shuttle/Stresshog) (Win)
Another Ghost list that suffered from Hera’s poor pilot skill. Again this one moved before Miranda so he could not capitalize on Hera’s ability. Like the previous match, he had an Autoblaster turret which hurt one round when the two Ghost‘s were at range one of each other but proved less effective most of the game when I could TLT him and he couldn’t use his second turret attack he was paying 18 points for.
This time I learned from my previous mistake in regards to the stresshog too. Miranda got double stressed early but I flew her away across the board, going over a debris field to gain a third stress, but she had time to recover with green maneuvers as she wasn’t trapped in a corner.
The game ended on a depressing note as he forgot to deploy Zeb at an earlier, ideal time and ended up with the Ghost off the board and no way for Phantom to deploy without doing the same.
Round 6- Intentional Draw
Going into this round my opponent offered me an ID (Intentional Draw). This was a risky move as taking it did not guarantee me a spot in the Top 16. But it was after 7pm (I got to the store at 9am) and I was hungry. I agreed to the draw and lucked out that enough people also drew, but not too many, that I was able to make the cut.
Top 16- Bounty Hunters (Boba/Dengar) (Win)
This match was against another Kessel Run podcast guy, Jeremey. I was sure I had lost this match on several occasions. Both of his ships were fielding Tacticians, which Ghost didn’t care about, but could potentially shut Miranda down with four stress in a round. I flubbed early with a Prox mine and missed landing it on anyone. Then I got Miranda flailing to shed stress in a corner.
The thing that saved me was my a decision to not shoot at Dengar one round. Miranda was at range 2 of Dengar, had been shot at and stressed once (after just shedding a bunch from earlier). Shooting Dengar would have allowed him to stress her again when he got his extra attack, potentially killing her with some lucky crits. By not taking the shot I was able to shed the one stress and get an action the next round, dropping my last Prox mine on him.
Again, I thought I was done when the Prox mine did nothing but Sabine damage. But this time I was able to shoot at Boba instead, avoiding another Dengar shot, and lived for yet another round that allowed me to drop a Seismic on both ships, killing Boba before he could shoot. By now, Dengar was damaged and stressed so Ghost was able to get behind him making use of his back-to-back 5 speed K-turns.
Top 8- Crack Swarm (Howlrunner, Wampa, 3x Black Squadron, 1 Omega Squadron) (Lost)
Facing another Crack Swarm I was fairly confident. Unfortunately, it was after 10pm and me being an old man I’m often in bed by then. My opponent was a phenomenal swarm player and he really knew his stuff. He never broke formation until the very end when it was just a clean up operation for him.
This is another game that I also kind of lost for myself. Early on I turned my ships instead of waiting him out. I also made the mistake of SLAMing Miranda thinking I would only end up in range of one TIE but ended up in range of four TIE’s. I managed to get her out of range the next round but she had no shields and no way to recover her shields, so she couldn’t shoot. My Ghost got really unlucky in that it took ten damage the first time it got shot. And he didn’t even need to use Howlrunner or Crack Shot for any of that damage.
It was a massacre and a bit of a sad way to end the day. He played well and ended up making it to the final game. But I would have probably felt better losing in the previous game as it was a closer match.
Summary
Overall I really liked this list. Miranda is a great bomb carrier and Sabine is amazing on a bomb list. The ability to do two damage against a high agility ship from a cheap seismic charge is a major threat. The Hera/Ezra/FCS combo is also great, allowing torpedoes, main guns or TLT’s to do consistent damage.
The biggest disappointment was the Plasma Torpedoes. Their main use was to have something to shoot out of the rear arc but most times TLT was just a better choice. If I took this again I would probably drop the extra munitions from the Ghost in order to upgrade them to Proton torpedoes and one Seismic charge to a Thermal Detonator.
I went into the tournament with a goal of just making it through with a winning record (4-2). I ended up with 5-2-1 record and made Top 8 so I exceeded expectations. A lot of fun and I look forward to returning next year.
Wayne Basta
Latest posts by Wayne Basta (see all)
- X-Wing Tier List – Rebels - May 10, 2023