
Welcome to Rogue Squadron, pilot! In this series, we will be looking at the ships you can fly in Fantasy Flight Games X-Wing miniatures game. We’ll take a look at a chassis and what makes it unique along with some upgrades and squadron combos. Strap in and get ready to fly.
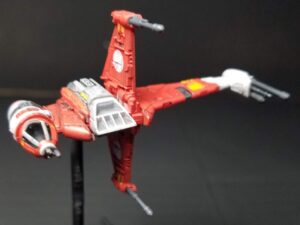
Lock S-Foils in Attack Position
Normally in this series we look at a single chassis, what it does well, and how to build each of the pilots. This time we’re going to do something a little different. Instead of analyzing a chassis, we’re going to look at an expansion box, in this case the Phoenix Cell pack. We’ll look at each pilot and then make some squadron builds using them and some of the new upgrades from the pack.
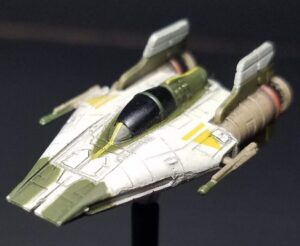
Red Five Standing By
Phoenix Cell comes out of the box with seven unique pilots across two ships. How do these pilots compare?
 Hera Syndulla (I6)- RZ-1 A-wing and A/SF-01 B-wing– While another friendly ship at range 1-2 defends or performs an attack, you may transfer 1 of your focus tokens, evade tokens, or locks to that ship.
- Hera’s ability is the same on both fighters but different from her ability in Ghost or the Attack Shuttle. Though she has gained I6 status.
- Her ability does nothing for herself, but that is okay. At I6, she has the best chance to arc dodge and will shoot first. She’ll therefore almost always know if she needs her tokens after she finishes her attack.
- The key take away is “While.” Not before. Not after. While gives her maximum flexibility as to when she transfers a token. Her ally needs to fire a torpedo? Transfer the Lock before weapon selection. An ally getting attacked? Wait for dice to be rolled and see if they even need that Evade token?
- Using the B6 Blade Wing Prototype and a Weapon Systems Officer she could consider taking some torpedoes. Fire them off, use the Lock to modify her dice, and then get a new Lock to pass to a lower initiative pilot.
- Ahsoka Tano (I5)- RZ-1 A-wing- After you fully execute a maneuver, you may choose a friendly ship at range 1-2 and spend 2 Force. That ship may perform an action, even while stressed.
- Like Hera, Ahsoka’s ability does nothing for herself.
- Similar to her Aethersprite ability but with greater range, greater cost and doesn’t work on herself. The Aethersprite is also a superior platform to the A-wing. Though she does gain two initiative over that version.
- Coupled with Patience she works as an I5 coordinate every round for 51 points. With her ability to give actions despite stress on her target there are shenanigans she can get up to.
- Using her ability does not require an action so she doesn’t hinder her own actions.
 Wedge Antilles (I4)- RZ-1 A-wing- While you perform a primary attack, if the defender is in your Forward Arc, the defender rolls 1 fewer defense die.
- Wedge comes in with almost the same ability as in his X-wing, just with two lower initiative. There are a few important distinctions however.
- It only works on a primary attack, though A-wings don’t take missiles often so that’s minor.
- It also only works in the Forward Arc, so you don’t get it if you take Vectored Cannons and shoot out the back.
- But it will still work if you fire out of the front with Vectored Cannons, because, unlike Outmaneuver, the defender needs to be in your Forward Arc, you don’t need to make a Forward Arc attack.
- The ability is extra important to him in an A-wing due to the reduced attack value.
- Wedge comes in with almost the same ability as in his X-wing, just with two lower initiative. There are a few important distinctions however.
- Shara Bey (I4)- RZ-1 A-wing- While you defend or perform a primary attack, you may spend 1 lock you have on the enemy ship to add 1 Focus result to your dice results.
- Unlike Wedge or Hera, Shara’s ability is identical to her ARC ability.
- It is harder for her to get double actions in an A-wing though. She has no Crew, Gunner, or Astromechs to help her.
- She makes a good wingmate for Ahsoka, Jake or Hera.
- Sabine Wren (I3)- RZ-1 A-wing- While you defend or perform an attack, if the attack range is 1 and you are in the enemy’s Forward Arc, you may change 1 of your results to an Evade or Hit result.
- Sabine is embracing her Mandolorian heritage as her ability is a combination of Fearless and Concordia Faceoff.
- Getting range 1 of a swarm is never a good idea but she can do it and ensure she’ll avoid at least one damage from each attack.
- Derek “Hobbie” Klivian (I3)- RZ-1 A-wing- After you acquire or spend a lock, you may remove 1 red token from yourself.
- Hobbie comes in at the same cost as a Green Squadron so if you’re ever taking Greens, and don’t specifically need generic pilots, there’s no reason not to take him instead.
- His ability is handy for clearing that stress A-wings love to get. Take a lock, boost, then spend the lock during combat and clear the stress.
- If he takes Starbird Slash, and fires before the ship he flies over, he’ll never need to worry about possibly straining himself.
- Netrem Pollard (I3)- A/SF-01 B-wing- After you barrel roll, you may choose 1 friendly ship that is not stressed at range 0-1. That ship gain’s 1 stress token, then you rotate 180º.
- He makes a good wingmate for Ten Numb who can make use of stress tokens.
- Advanced Sensors give him some funky maneuvers. Pre-move barrel roll, keep the stress, rotate, clear the stress with a blue.
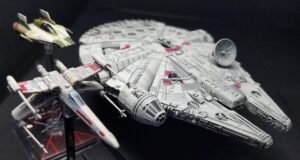
All Wings Report In
Do you need to buy more than one Phoenix Cell? Probably not. If you really like the new paint-jobs, sure. If you want to fly a list with more then four Vectored Cannons and are playing in a tournament with overly strict rules, then you might need another. But beyond that, the best stuff is limited anyways.
Bane of the Mid-Tier (Hyperspace)
- Wedge Antilles (RZ-1 A-wing)
- Shara Bey (RZ-1 A-wing)
- Jake Farrell (RZ-1 A-wing)
- Sabine Wren (RZ-1 A-wing)
- Arvel Crynyd (RZ-1 A-wing)
- Derek “Hobbie” Klivian (RZ-1 A-wing)
I found it interesting that all of the A-wing I3 and I4 named pilots fit perfectly in a 200 point list with no upgrades. And they don’t make a bad list either. You have Wedge trying to flank. Jake working with Shara to give her a focus so she can use her action to Lock and trigger her ability. Sabine and Arvel roll right up into the middle of the fight to cause trouble. Hobbie is a wildcard with easier stress clearing if he locks.
Ahsoka’s Trainees (Hyperspace)
- Ahsoka Tano (RZ-1 A-wing)
- Patience
- Braylen Stramm (A/SF-01 B-wing)
- Synced Laser Cannons
- Stabilized S-Foils
- Ten Numb (A/SF-01 B-wing)
- Fire Control System
- Synced Laser Cannons
- Stabilized S-Foils
- Derek “Hobbie” Klivian (RZ-1 A-wing)
- Hopeful
Ahsoka can coordinate through stress. With Patience, if she can maintain arc, she can do it every round, reducing her measly two dice to one. But with Braylen, she can trade her weak attack so that the B-wing gets to fire two three dice attacks, with double mods. Ten can get the double mods just through stressing himself but wouldn’t say no to an extra focus if Braylen’s not in position. She can also give Hobbie a Lock so he can clear his stress.
Alternatively, you could change Hobbie to a Phoenix Squadron Pilot and add an Ion Missile if you wanted another three dice attack option. Likewise, you can switch out the Synced Laser Cannons for Ion Cannons if you want to go full board control.
Rebellions are Built on Hope (Extended)
- AP-5 (Sheathipede Shuttle)
- Jyn Erso
- Hopeful
- 5x Green Squadron Pilot (RZ-1 A-wing)
- Hopeful
- Starbird Slash
- Vectored Cannons
With Starbird Slash and Vectored Cannons, the A-wings can rotate their cannons to the rear during the system phase and then blast through the enemy formation (with one of the A-wing’s many blue maneuvers). This passes on a strain, clears the A-wings stress and lets them Lock. During combat, if any of them die, Hopeful gives the whole squad a boost or focus. Jyn lets them turn the focus into an evade if that would be more useful.
 Rebel Generals (Extended)
- Hera Syndulla (RZ-1 A-wing)
- Ion Missile
- Starbird Slash
- Wedge Antilles (T-65 X-wing)
- Servomotor S-foils
- Han Solo (Modified YT-1300)
- Agile Gunner
- C-3P0
- Engine Upgrade
- Millenium Falcon
The Rebels now have three I6 pilots. Han and Wedge are both huge targets but Hera comes in with some support. Unless she plans to fire an Ion Missile, she will primarily Evade. Then she can transfer that Evade to whichever of the other two ships becomes the primary target. If she passes it to Han, he can make use of his ability and the Millennium Falcon title for excellent defense potential. He’ll either be Boosting to avoid arcs or double calculating with C-3P0. If you want to have a bid, Sabine, Backwards Tailslide, Starbird Slash and Ion Missile can all go. Sabine is handy for helping the squad stay stress free so she should be the last upgrade to drop.
- Hera Syndulla (VCX-100)
- Ghost
- Phoenix Squadron
- Nien Nunb
- Dorsal Turret
- Zeb Orrelius (Attack Shuttle)
- Phantom
- 4x Phoenix Squadron Pilot (RZ-1 A-wing)
- AP-5 (Sheathipede Shuttle)
- Netrem Pollard (A/SF-01 B-wing)
- B6 Blade Wing Prototype
- Weapon Systems Officer
- Alderaanian Guard (CR-90)
- Liberator
- Toryn Farr
- Targeting Battery
- Turbolaser Battery
We don’t normally do Epic lists but this pack comes with some fun upgrades for Epic. Phoenix Squadron allows for a wing setup. Normally wings consist of ships of the same type but here you can mix four different types. Here you want to fly Hera with Zeb docked and four A-wings escort. They can absorb some damage for her. Zeb gives her a rear arc. You can either take Nien Nunb (or drop Pollard to a Blue) or ditch him to give all those A-wings Vectored Cannons so they can also shoot out the back.
Meanwhile, the CR-90 is carrying the B-Wing and AP-5. Interestingly, the Sheathipede ability says its carrier ship, not specifically Ghost. This allows the CR-90 to make free coordinate actions when it activates. At Initiative 0, that’s not very handy but an option. Alternatively, you can switch AP-5 and an A-wing so AP-5 can coordinate the wing.
The CR-90 makes an attack with it’s Targeting Battery, gains a lock, fires its Turbolaser, all at range 5. Then, next round, you deploy the B-wing. Pollard can get a free focus or barrel roll. If he chooses to barrel roll, he can pass the stress onto CR-90 if he uses his 180 tu8rn. On its turn, the CR-90 locks, links to coordinate with Toryn, this allows the B-wing to acquire a lock at range 4. It can do this even if it gets no action due to stress from the coordinate. This allows the B-wing to fire it’s special cannon at range 4. Then, weapon system specialist allows the B-wing to reacquire its lock so it can fire again next round when it’s ioned. If you’ve deployed it correctly, it can inch forward with those ions for a few rounds, pumping damage into your opponents huge ship.


Wayne Basta
Latest posts by Wayne Basta (see all)
- X-Wing Tier List – Rebels - May 10, 2023